
Deploy Java Helm chart on EKS using ArgoCD and GitHub Actions / DevOps Project - 1
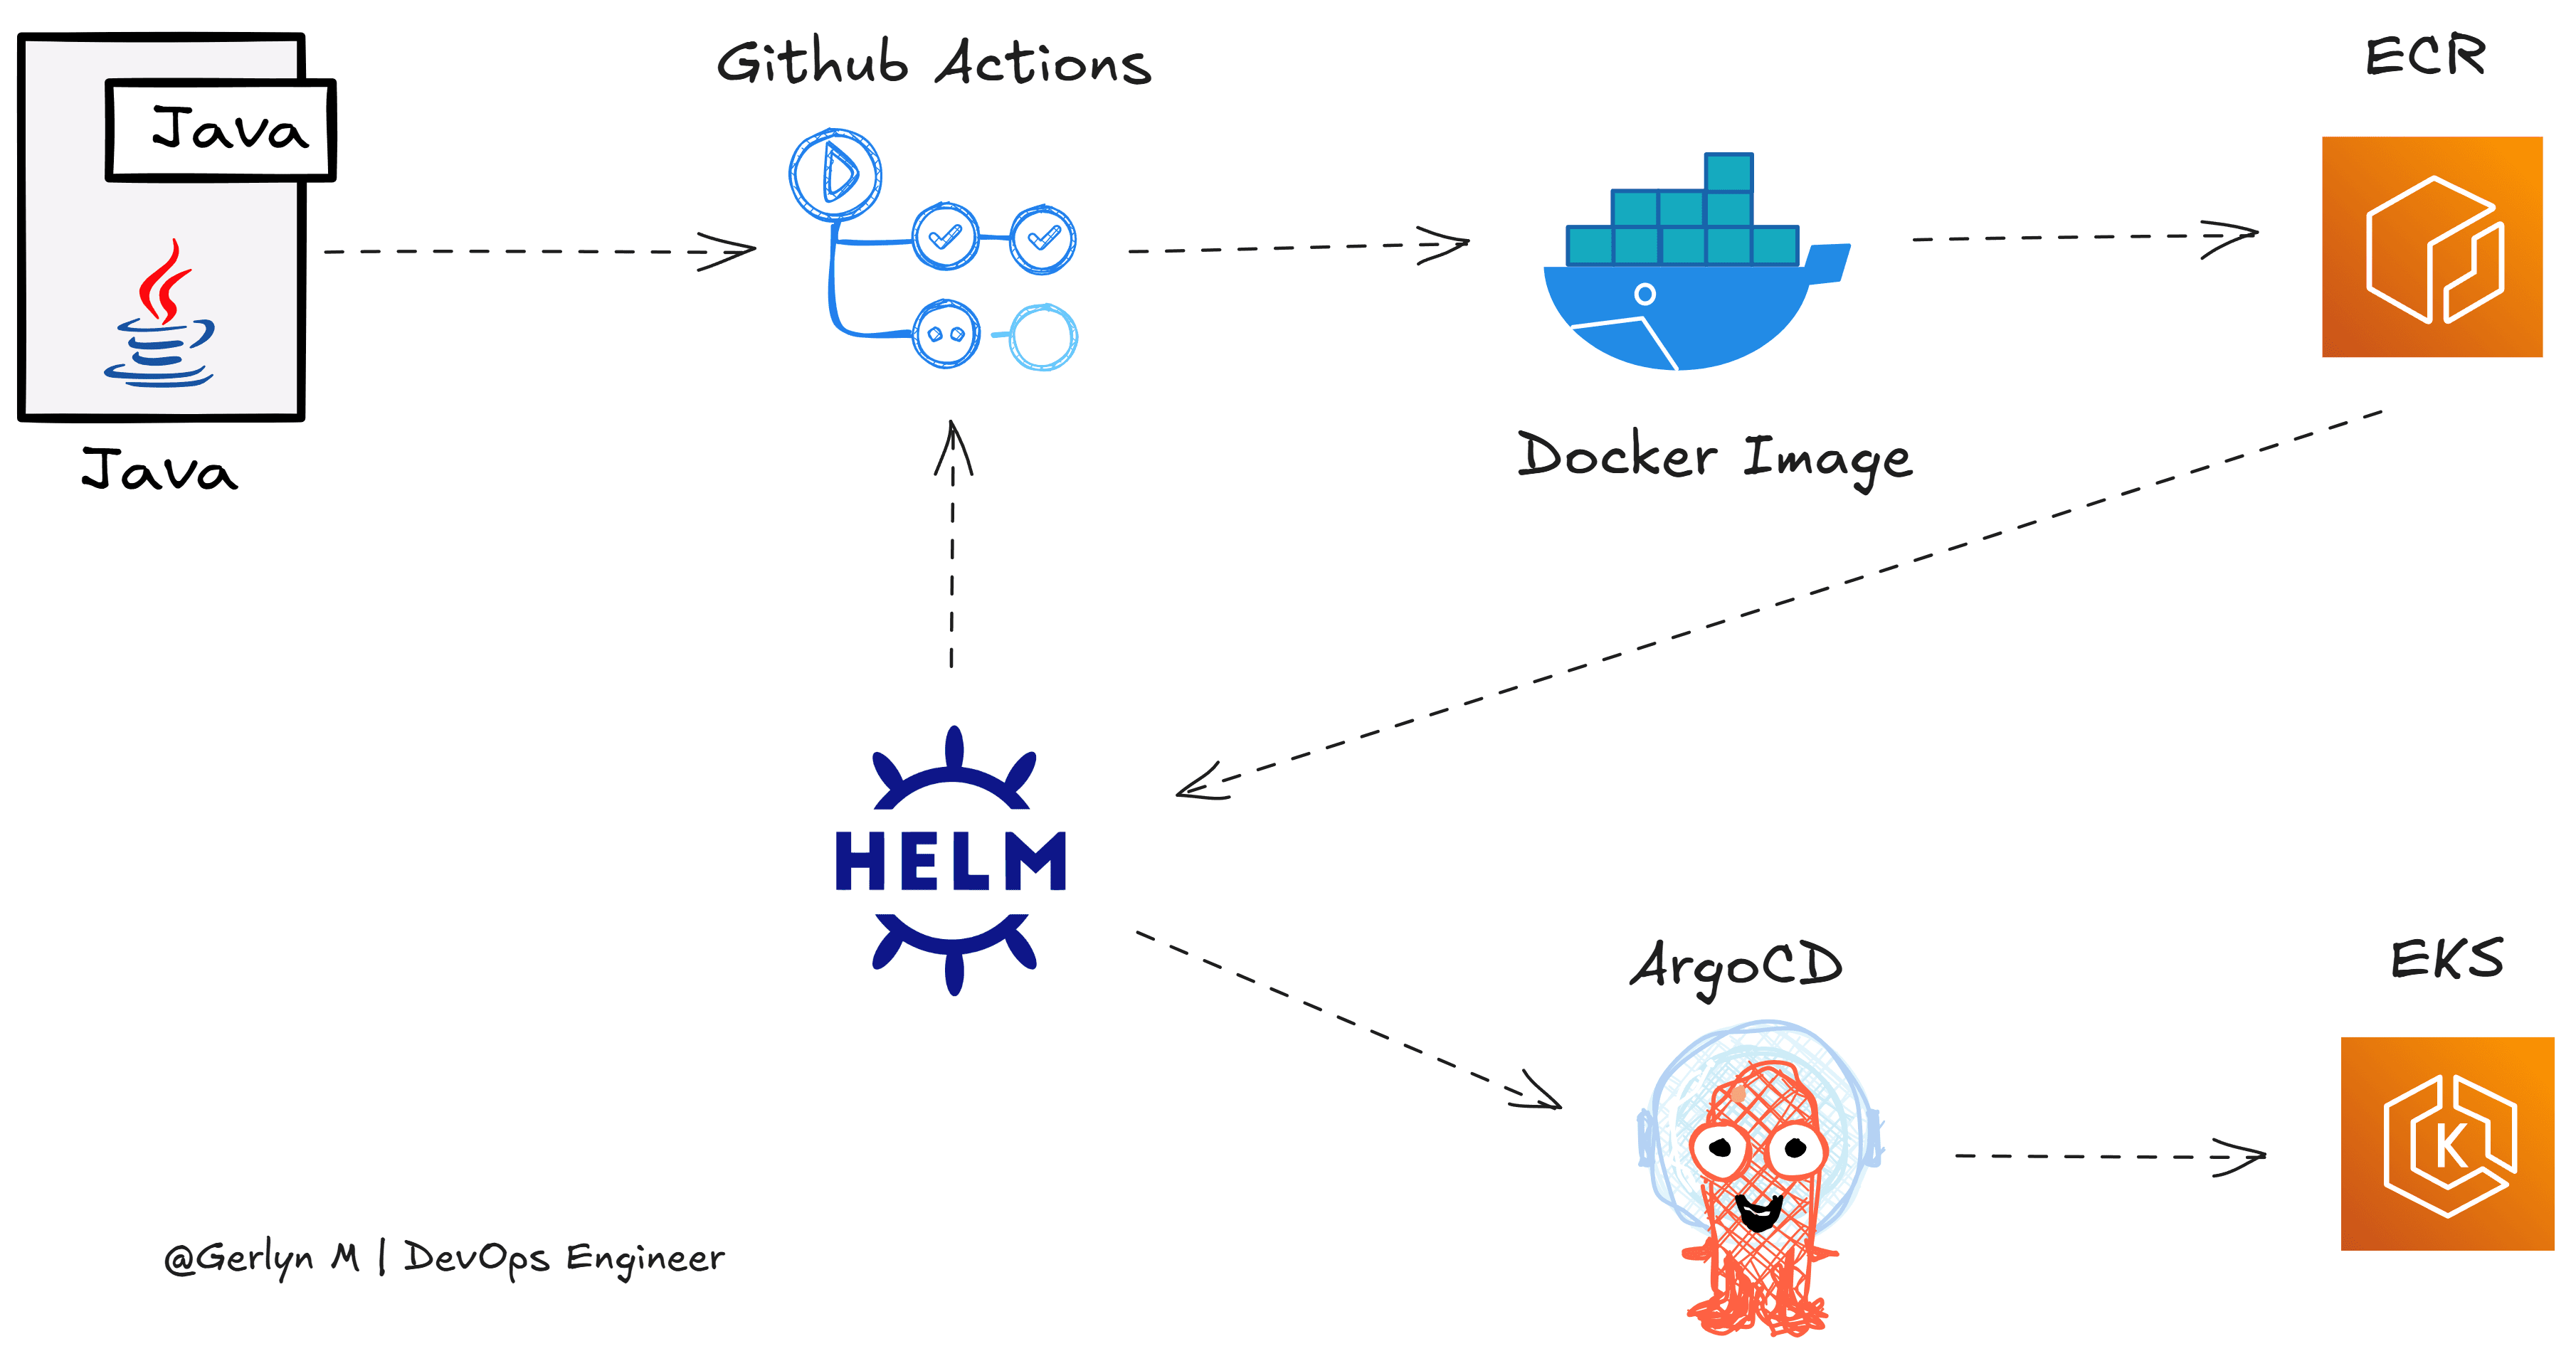
In this Article we are going to deploy a java application on AWS EKS cluster. For that we are going to containerize the application, creates Helm charts, install Argocd on EKS cluster, Using GitHub Actions for CI also we are using nginx ingress controller for exposing our application.
📌Resources: https://github.com/gerlynm/java-deployment.git
Create EKS cluster using eksctl
At first, we can start with creating EKS cluster using eksctl. It will take up to 10 to 15 minutes of time for provisioning resources.
eksctl create cluster --name java-eks-cluster --region ap-south-1 --nodegroup-name java-eks-nodes --node-type t2.micro --nodes 2 --profile magic
While waiting for the resource to be created, we can create Dockerfile for our java application.
Create Docker file for Java application
You can change the Dockerfile as per your requirement.
# Create the image using a distroless base image
FROM gcr.io/distroless/java17-debian11

# Set the working directory
WORKDIR /app

# Copy the JAR file from the build stage
COPY /target/*.jar ./java.jar

# Expose the port the application runs on
EXPOSE 8080

# Run the application
ENTRYPOINT ["java", "-jar", "java.jar"]
Using base image as
distrolessimage because it has only the necessary runtime libraries and no package manager or shell, also we can be able to reduce image size by using this.WORKDIRsets the working directory inside the container to/app.COPYit copies the JAR file from our localtargetdirectory into the container.EXPOSEthis command informs container listens on port8080, and it doesn’t publish the port.ENTRYPOINTit runs the Java application using thejava -jarcommand, specifying thejava.jarfile that was copied earlier.
Create Helm charts
Helm charts are package manager for Kubernetes environment, also we can simply create manifest files without typing manually.
Using the below command to create a sample helm chart and we can alter it as per our requirement.
helm create java-api-charts
Depending upon the project requirement we need to modify the helm charts templates.
In our case we are going to modify some files like services.yaml, deployments.yaml, values.yml
Below I have mentioned code snippets what are the changes needs to make in each file.
deployment.yaml
ports:
  - name: http
    containerPort: {{ .Values.service.targetPort }}
    protocol: TCP
service.yaml
ports:
    - port: {{ .Values.service.port }}
      targetPort: {{ .Values.service.targetPort }}
      protocol: TCP
      name: http
values.yaml
image:
  repository: <aws-account-id>.dkr.ecr.ap-south-1.amazonaws.com/<repo-name>
  # This sets the pull policy for images.
  pullPolicy: IfNotPresent
  # Overrides the image tag whose default is the chart appVersion.
  tag: "latest"

service:
  # This sets the service type more information can be found here: https://kubernetes.io/docs/concepts/services-networking/service/#publishing-services-service-types
  type: ClusterIP
  # This sets the ports more information can be found here: https://kubernetes.io/docs/concepts/services-networking/service/#field-spec-ports
  port: 80
  targetPort: 8080

ingress:
  enabled: true
  className: "nginx"
  annotations:
    nginx.ingress.kubernetes.io/rewrite-target: /
    # kubernetes.io/ingress.class: nginx
    # kubernetes.io/tls-acme: "true"
  hosts:
    - host: rest-java-api.local
      paths:
        - path: /
          pathType: Prefix

livenessProbe:
  httpGet:
    path: /hello-world
    port: 8080
readinessProbe:
  httpGet:
    path: /hello-world
    port: 8080
Create ECR in AWS
To avoid clicky clicky…... Just create ECR repository by using below command
aws ecr create-repository --repository-name rest-java-api --profile magic
Install Nginx Ingress Controller (NLB)
This command will install the nginx ingress controller in the cluster and creates a Network Load balancer in our AWS account.
kubectl apply -f https://raw.githubusercontent.com/kubernetes/ingress-nginx/controller-v1.12.0-beta.0/deploy/static/provider/aws/deploy.yaml
📌 NLB (Network Load Balancer) doesn’t natively handle HTTP/HTTPS
But You can still route HTTP/HTTPS traffic by configuring the NLB to forward the traffic to your instances, which can be handled by an ingress controller (like NGINX) running within your Kubernetes cluster.
Install ArgoCD in EKS cluster
Using below command can be able to install ArgoCD in our EKS cluster.
kubectl create namespace argocd
kubectl apply -n argocd -f https://raw.githubusercontent.com/argoproj/argo-cd/stable/manifests/install.yaml
To access the ArgoCD UI
They are multiple ways to access ArgoCD UI, here we are using simplest way
kubectl get svc -n argocd #look for service named "argocd-server"
kubectl port-forward svc/argocd-server 8080:443 -n argocd
(Optional) To run kubectl port-forward command in background use below command
#To run the process
nohup kubectl port-forward svc/argocd-server 8080:443 -n argocd &
tail -f nohup.out

#To kill the process
ps aux | grep 'kubectl port-forward'
kill <PID>
For Login into the argoCD UI
Get the secrets of argocd namespace.
Then edit the secret named
argocd-initial-admin-secretto view the secret. Copy that.By default, that copied password is encoded with base64, so to decode that password use the below
base64command.kubectl get secrets -n argocd kubectl edit secrets argocd-initial-admin-secret -n argocd echo <password> | base64 --decodeNow provide the credentials in the login page. The default username is
admin

Create GitHub Actions workflow
This is our GitHub Actions workflow for our Java application
Configure the triggers (main, master, dev etc…)
Choose the working Directory
Configure Java and build the application using Maven.
Configures AWS credentials.
Logs in to Amazon ECR (Elastic Container Registry).
Builds a Docker image and pushes it to ECR.
name: Java CI with Maven and Dockerized it then push it to AWS ECR

on:
  push:
    branches: [ "master" ]
  pull_request:
    branches: [ "master" ]

jobs:
  build:
    runs-on: ubuntu-latest
    defaults:
      run:
        working-directory: 01-hello-world-rest-api
    steps:
    - uses: actions/checkout@v4
    - name: Set up JDK 17
      uses: actions/setup-java@v4
      with:
        java-version: '17'
        distribution: 'temurin'
        cache: maven

    - name: Build with Maven
      run: mvn clean package -DskipTests

    - name: Configure AWS Credentials
      uses: aws-actions/configure-aws-credentials@v1
      with:
        aws-access-key-id: ${{ secrets.AWS_ACCESS_KEY_ID }}
        aws-secret-access-key: ${{ secrets.AWS_SECRET_ACCESS_KEY }}
        aws-region: ap-south-1

    - name: Login to Amazon ECR
      id: login-ecr
      uses: aws-actions/amazon-ecr-login@v1

    - name: Build, tag, and push docker image to Amazon ECR
      env:
        REGISTRY: ${{ steps.login-ecr.outputs.registry }}
        REPOSITORY: ${{ secrets.AWS_ECR }}
        IMAGE_TAG: latest
      run: |
        docker build -t $REGISTRY/$REPOSITORY:$IMAGE_TAG .
        docker push $REGISTRY/$REPOSITORY:$IMAGE_TAG
Add the AWS Credentials and ECR repository name as secrets on the repository secrets.

Create ArgoCD application
Click on NEW APP button > provide Application Name, Project Name, Sync Policy, GitHub Repository, Path.
Then click Create button.

Application Deployed!
Within couple of seconds our argoCD application will sync up with our repository and deploy the application.
From the below image we can see all objects are in healthy state.

Access the Application via CLI
As we configured the local domain (rest-java-api.local) in ingress. The load balancer listens on that particular domain name.
To access using local domain follow the steps below
host <loadbalancer-dns-name>
Using host command, we can get the Ip address of the load balancer.
Then using the below command with the load balancer Ip address can get the desired output.
# Replace 13.200.151.192 with your load balancer ip address
curl -H "Host: rest-java-api.local" 13.200.151.192/hello-world
This command will send a request to http://13.200.151.192/hello-world with the Host header set to rest-java-api.local.
In simple terms, this command sends a request to a specific IP address but tells the server it's trying to reach a specific domain.

Here you can see the Hello World output from our application.
Access the Application via UI
To access the application using UI we need to setup the DNS mapping for our local domain name.
I have already written docs on how to step up DNS mapping, follow those steps and browse this URL: rest-java-api.local/hello-world
📌 In Realtime scenarios we would use valid domain name like google.com, amazon.com, so above step not required in Realtime Projects.

Clean Up the Resources
To delete all the resources created for this project use the below command.
Delete the EKS cluster
eksctl delete cluster --name eks-cluster --region ap-south-1 --profile magic
Delete ECR Repository
aws ecr delete-repository --repository-name rest-java-api --force --profile magic
Thanks for sticking with me until the end! 😊
I hope you found this project valuable and worth your time. If you have any suggestions, ideas, or thoughts to add, feel free to drop them in the comments. 👇📩
Your feedback means a lot! Don’t forget to hit that like ❤️ button to show your support and stay tuned for more content. 🔔
⭐Thanks again!
#getintokube #getintokubeblogs